安装
StackStorm作为RPM和Debs分发用于RedHat / CentOS和Ubuntu Linux系统,以及Docker镜像。您可以使用脚本在单个系统上自动安装和配置所有组件,也可以按照操作系统的手动说明进行操作。
以下是选项概述:
一键安装:运行我们的安装脚本,在单个系统上进行所有组件的固定安装。这是我们推荐的入门方式。有关详细信息,请参阅下面的“ 快速安装
手动安装:有定制需求吗?也许您的服务器无法访问Internet?或者只是不喜欢使用脚本安装?阅读适用于您的操作系统的手册安装说明(Ubuntu 14 / 16,RHEL / CentOS 6,RHEL / CentOS 7),并根据您的需要进行调整。以下是为StackStorm repos设置内部镜像的一些其他指导。
Ansible Playbooks:如果您是Ansible用户,请查看这些Ansible Playbooks以安装StackStorm。非常适合StackStorm的可重复,一致,幂等安装。
高可用性将业务关键自动化任务委托给像StackStorm这样的系统会对该系统产生更高的要求。StackStorm可以在HA模式下运行以确保满足这些需求。 Kubernetes中的StackStorm HA集群 - BETA将整个复杂的基础架构自动化为可重现的蓝图。
参考文档
系统要求
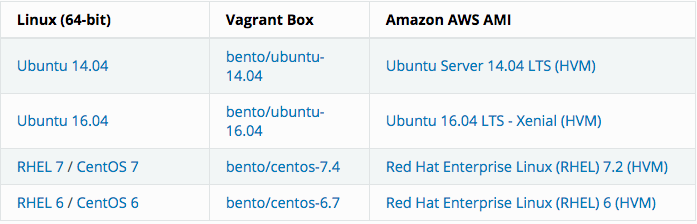
StackStorm需要Ubuntu,RHEL或CentOS Linux。并且仅支持64位架构。
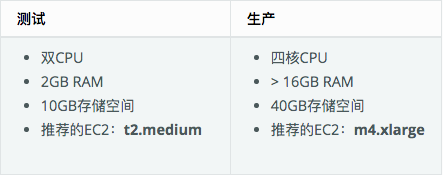
这是测试和部署StackStorm的建议最小大小:
安装
系统环境
RHEL 7 / CentOS 7
调整SELinux策略
如果您的系统在执行模式下具有SELinux,请按照这些说明调整SELinux策略。这是成功安装所必需的。如果您对这些政策不满意,可能需要根据您的安全措施进行调整
- 首先检查SELinux是否处于执行模式:
1 | getenforce |
- 如果上一个命令返回“Enforcing”,则运行以下命令:
1 | SELINUX management tools, not available for some minimal installations |
安装依赖项
提示:目前支持的MongoDB版本是3.4。这是安装程序脚本安装的版本。MongoDB 3.6及更新版目前不支持StackStorm。将在StackStorm的未来版本中添加对4.0的支持
安装MongoDB,RabbitMQ和PostgreSQL:
1 | sudo yum -y install https://dl.fedoraproject.org/pub/epel/epel-release-latest-7.noarch.rpm |
设置存储库
以下脚本将检测您的平台和体系结构,并设置相应的StackStorm存储库。它还将添加用于包签名的GPG密钥。
1 | curl -s https://packagecloud.io/install/repositories/StackStorm/stable/script.rpm.sh | sudo bash |
安装StackStorm组件
1 | sudo yum install -y st2 st2mistral |
如果您没有在同一系统上运行RabbitMQ,MongoDB或PostgreSQL,或者更改了默认值,请调整以下设置:
RabbitMQ连接
/etc/st2/st2.conf和/etc/mistral/mistral.confMongoDB在
/etc/st2/st2.confPostgreSQL在
/etc/mistral/mistral.conf
设置数据存储区加密
在key-value存储,允许用户存储加密的值(秘密)。这些是使用对称加密(AES256)存储的。要生成加密密钥,请运行以下命令:
1 | DATASTORE_ENCRYPTION_KEYS_DIRECTORY="/etc/st2/keys" |
设置Mistral数据库
运行以下命令以设置Mistral PostgreSQL数据库
1 | Create Mistral DB in PostgreSQL |
配置SSH和SUDO
要运行本地和远程shell操作,StackStorm使用特殊系统用户(默认情况下stanley)。对于远程Linux操作,使用SSH。我们建议在所有远程主机上配置基于公钥的SSH访问。我们还建议配置对localhost的SSH访问以运行示例和测试。
- 创建StackStorm系统用户,启用无密码sudo,并设置对“localhost”的ssh访问,以便可以在本地测试基于SSH的操作。您需要提升权限才能执行此操作:
1 | Create an SSH system user (default `stanley` user may already exist) |
在远程主机上配置SSH访问并启用无密码sudo,StackStorm将通过SSH运行远程操作。使用上一步中生成的公钥,按照配置SSH中的说明进行操作。要控制Windows框,请为Windows运行程序配置访问权限 。
如果您使用的是其他用户或SSH密钥的路径,则需要在以下位置更改此部分
/etc/st2/st2.conf:
1 | [system_user] |
启动服务
- 启动服务:
1 | sudo st2ctl start |
- 注册传感器,规则和操作:
1 | sudo st2ctl reload |
校验
以下命令将测试StackStorm安装。他们都应该成功完成:
1 | st2 --version |
使用supervisor脚本管理StackStorm服务:
1 | sudo st2ctl start|stop|status|restart|restart-component|reload|clean |
以愉快地使用StackStorm了。
但没有Web UI就没有乐趣,没有SSL或身份验证就没有安全感,没有ChatOps就没有乐趣,没有Extreme Workflow Composer就没钱了。继续阅读!
配置验证
为简单起见,参考部署使用基于文件的身份验证提供程序。请参阅 身份验证以配置和使用PAM或LDAP身份验证后端。
要使用基于文件的提供程序设置身份验证:
- 使用密码创建用户:
1 | Install htpasswd utility if you don't have it |
- 启用并配置身份验证
/etc/st2/st2.conf:
1 | [auth] |
- 重启st2api服务:
1 | sudo st2ctl restart-component st2api |
- 验证,并检查它是否有效:
1 | Login - you will be prompted for password (default 'Ch@ngeMe') |
安装WebUI并设置SSL终止
NGINX用于提供WebUI静态文件,将HTTP重定向到HTTPS,提供SSL终止,以及反向代理st2auth和st2api API端点。要进行设置:安装 st2web和nginx包,生成证书或放置现有证书/etc/ssl/st2,并使用StackStorm提供的站点配置文件st2.conf配置nginx
StackStorm依赖于Nginx版本> = 1.7.5。RHEL在软件包存储库中有一个旧版本,因此您需要添加官方Nginx存储库:
1 | Add key and repo for the latest stable nginx |
如果修改nginx配置中的ports或url路径,请在st2web配置中进行相应的更改/opt/stackstorm/static/webui/config.js
使用浏览器连接https://${ST2_HOSTNAME}并登录WebUI
如果您无法连接到Web浏览器,则可能需要更改默认防火墙设置。您可以使用以下命令执行此操作:
1 | firewall-cmd --zone=public --add-service=http --add-service=https |
这将允许入站HTTP(端口80)和HTTPS(端口443)流量,并使这些更改在重新启动后继续存在。
如果您尝试从框外访问API并且已根据这些说明配置了nginx,请使用https://${EXTERNAL_IP}/api/v1/${REST_ENDPOINT}。
例如:
1 | curl -X GET -H 'Connection: keep-alive' -H 'User-Agent: manual/curl' -H 'Accept-Encoding: gzip, deflate' -H 'Accept: */*' -H 'X-Auth-Token: <YOUR_TOKEN>' https://1.2.3.4/api/v1/actions |
同样,您可以使用连接到auth REST端点https://${EXTERNAL_IP}/auth/v1/${AUTH_ENDPOINT}。
您可以通过向--debugCLI命令添加适当资源的选项来查看资源的实际REST端点。
例如,要查看获取操作的端点,请调用:
1 | st2 --debug action list |
设置ChatOps
如果您已经运行了Hubot实例,则可以安装hubot-stackstorm插件并配置StackStorm环境变量,如下所述。否则,启用StackStorm ChatOps的最简单方法 是使用st2chatops包。
- 验证
chatops是否已安装该包,并启用了通知规则:
1 | Ensure chatops pack is in place |
1 | curl -sL https://rpm.nodesource.com/setup_10.x | sudo -E bash - |
- 安装
st2chatops包:
1 | sudo yum install -y st2chatops |
查看并编辑
/opt/stackstorm/chatops/st2chatops.env配置文件,将其指向StackStorm安装和您正在使用的聊天服务。您至少应该生成 API密钥并设置ST2_API_KEY变量。默认情况下st2api,st2auth预计它们位于同一主机上。如果不是这种情况,请更新ST2_API和ST2_AUTH_URL变量或只是指向正确的主机ST2_HOSTNAME。示例配置使用Slack。要进行此设置,请转到Slack Web管理界面,创建一个Bot,然后将身份验证令牌复制到
HUBOT_SLACK_TOKEN。如果您使用的是其他聊天服务,请在以下部分中设置相应的环境变量 : Slack, HipChat,Flowdock, IRC, Mattermost, RocketChat,XMPP。
Chat service adapter settings``st2chatops.env启动服务:
1 | sudo systemctl start st2chatops |
- 重新加载st2包以确保
chatops.notify注册规则:
1 | sudo st2ctl reload --register-all |
开始聊天吧!!!
安全注意事项
默认情况下,安装MongoDB,RabbitMQ和PostgreSQL时,它们会禁用身份验证或使用默认静态密码。因此,在安装这些服务之后,您应该配置它们并使用强大的随机生成的密码启用身份验证。
注意:如果您使用StackStorm安装脚本,则会自动完成此操作。
为这些服务配置授权和密码超出了本文档的范围。有关更多信息,请参阅以下链接
- MongoDB的- https://docs.mongodb.com/manual/tutorial/enable-authentication/,https://docs.mongodb.com/manual/core/authorization/
- RabbitMQ - https://www.rabbitmq.com/authentication.html
- PostgreSQL - https://www.postgresql.org/docs/9.4/static/auth-methods.html
为这些组件启用身份验证后,还需要更新StackStorm服务以使用新设置。
这意味着编辑以下配置选项:
- StackStorm -
/etc/st2/st2.conf
database.username- MongoDB数据库用户名。
database.password- MongoDB数据库密码。
messaging.url- RabbitMQ传输网址(amqp://<username>:<password>@<hostname>:5672)
2,mistral - /etc/mistral/mistral.conf
database.connection- PostgreSQL数据库连接字符串(postgresql+psycopg2://<username>:<password>@<hostname>/mistral)transport_url- RabbitMQ传输网址(rabbit://<username>:<password>@<hostname>:5672)
此外,强烈建议您遵循以下最佳实践来运行网络服务:
- 确保服务之间的通信已加密。为MongoDB,RabbitMQ和PostgreSQL启用SSL / TLS。
- 将服务配置为仅侦听localhost,并在需要时侦听内部IP地址。通常不需要StackStorm(MongoDB,RabbitMQ,PostgreSQL)使用的大多数服务在公共IP地址上可用。
- 配置防火墙并设置白名单。防火墙应仅允许那些需要访问这些服务的用户和系统进行访问。API和auth服务通常需要您的用户可访问,但其他相关服务(如MongoDB,RabbitMQ和PostgreSQL)则不需要。这些不应该由用户直接访问,并且只允许StackStorm组件与它们通信。
- 在可能的情况下,您还应该使用其他基于网络的隔离和安全功能,例如DMZ。
上述步骤对于StackStorm组件在多个服务器上运行的分布式生产部署尤为重要。
升级到Extreme Workflow Composer
Extreme Workflow Composer将Workflow Designer(用于创建/编辑工作流的图形工具),RBAC和LDAP添加到StackStorm。它作为一组附加软件包部署在StackStorm之上。您将需要一个有效的Extreme Workflow Composer订阅和一个许可证密钥来访问Extreme Workflow Composer存储库。
要了解有关Extreme Workflow Composer的更多信息,请求报价或获取评估许可证,请访问stackstorm.com/product。
要安装Extreme Workflow Composer,请${EWC_LICENSE_KEY}在下面的命令中使用您在注册或购买时收到的密钥进行替换,然后运行以下命令:
1 | Set up Extreme Workflow Composer repository access |

